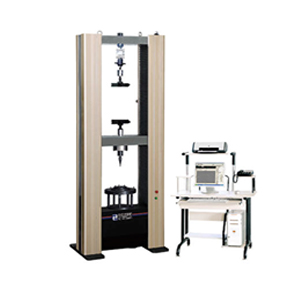


The testing machine uses AC servo motor as a power source; the use of advanced chip technology, professional design of PCI data acquisition and control system amplification, test force, deformation amplification, A / D conversion process to achieve a fully digital adjustment. The unit can perform mechanical testing and analysis of the performance of geosynthetics.
The standard used:
■ JTG E50-2006 "Highway Engineering Geosynthetics experimental protocols
■ GB / T 15788-2005 "Geotextiles and related products - wide strip tensile test method
■ GB / T 16989-1997 "geotextile joints / seams wide strip tensile test method"
■ GB / T 14800-1993 "geotextile bursting strength test method" (equivalent to ASTM D 3787)
■ GB / T 13763-1992 "geotextile trapezoid tearing strength test method"
■ GB / T 1040-1992 "Test Method for Tensile Properties of Plastics"
Belongs materials: metals, plastics, composites, springs, clothing / footwear, wood, rubber / elastomer, foam materials, biomedical, line pipe, electrical / electronic, bonding, paper, textiles, film, parts, ceramic / glass , food and packaging.
Industry: material tests and analysis of steel metallurgy, building materials, aerospace, machinery manufacturing, wire and cable, rubber, plastics, textiles, home appliances and other industries, scientific research institutions, universities, industrial and mining enterprises, technical supervision, inspection and arbitration department ideal test equipment
Test Type: tensile, compression, bending, shear, peel, low cycle fatigue.
|
The biggest test of |
10KN |
20KN |
50KN |
|
|
Test force measurement range |
2% -100% (0.4% -100%) the maximum test force |
|||
|
Test force measurement error |
± 1% precision (± 0.5%) |
|||
|
Test force value is displayed |
Direct reading the computer screen |
|||
|
Photoelectric encoder to measure the displacement, displacement between the jaws displayed by the computer screen. |
||||
|
Displacement resolution |
0.01mm |
|||
|
Measurement error |
± 1% precision (± 0.5%) |
|||
|
Displacement range |
0-700mm |
|||
|
Measurement error |
±0.1%FS |
|||
|
Displacement speed control range |
0.01-500mm / min stepless |
|||
|
Tensile test space |
700mm |
|||
|
Compression test space |
600mm |
|||
|
Test space width |
400mm It can also be customized according to requirements |
|||
|
Working environment |
Ventilated, easy to heat, ambient temperature 5 ℃ ~ 35 ℃ |
|||
|
Protection |
Overload protection, limit protection |
|||
|
Power supply |
220V |
|||
|
Working environment |
Room temperature -45 ℃, humidity 20% -80% |
|||
|
Fixture form |
According to customer requirements, configure the appropriate fixture. Special fixtures can be customized according to customer。 |
|||
|
|
|
|
||
■ During the test the speed of moving beams automatically according to
pre-set change, you can manually change;
■ Automatic switching depending on the load size to the appropriate range to
ensure the accuracy of measurement data; zero test force measurement,
calibration and archiving, without any analog adjustment links, highly
integrated control circuit;
■ Automatic Calibration: The system can automatically show the accuracy of the
calibration value;
■ Automatic saving: the end of the test, the test data and curves automatically
saved;
■ process to achieve: the testing process, measurement, display, and analysis
by the computer to complete;
■ batch test: The specimen of the same parameters, can be sequentially
completed after a set;


